 Save to Pinterest
 The first time I attempted a graduation sheet cake, the kitchen was filled with the sounds of distant laughter and clinking pans from my family, prepping for a backyard celebration. Butter sizzled in the mixer as sunlight streamed across the counter, making the whole room glow. I remember hesitating when swirling the buttercream roses—it felt risky, but the promise of a festive centerpiece was too tempting to resist. There—amid measuring cups and bursts of food coloring—was a sense of collective anticipation, and the cake transformed into a joyful challenge worth sharing. Every time I set the diploma on top, even if it was a bit lopsided, I couldn't help but marvel at how such a simple sheet cake could steal the show.
I once baked this cake for my cousin's graduation barbecue, and we joked about the diploma decoration taking longer than her actual homework. The kitchen got a little chaotic: piping bags everywhere, someone sneaking tastes of frosting, and a playlist of 'pomp and circumstance' playing in the background. Midway through, we realized the edible pearls make oddly satisfying little taps as they're sprinkled. When we carried the finished cake outside, the crowd gathered, phones out, and for a moment, nothing mattered except admiring the layers of buttercream and bright school colors. Weeks later, people still talked about that cake.
Ingredients
- All-purpose flour: Measuring flour carefully helps avoid a dense cake, and I've learned to fluff, spoon, and level for accuracy.
- Granulated sugar: The sweetness is balanced, and sifting out any lumps brings a finer crumb.
- Unsalted butter: Room temperature butter beats up fluffy and makes both cake and frosting rich—don't rush softening!
- Whole milk: Using milk at room temperature keeps the batter smooth and prevents curdling.
- Large eggs: Crack each one separately, and let them come to room temp to avoid streaks in your batter.
- Vanilla extract: It's worth using real vanilla for deep flavor—fake doesn't quite sparkle.
- Baking powder: Whisk it well with the flour so your cake rises evenly all over.
- Salt: Just a little—it subtly brings out sweetness.
- Powdered sugar: Sift for lump-free buttercream, which makes piping silky smooth.
- Food coloring: Gel coloring gives vibrant shades without watering down your frosting.
- Edible pearls: Tossed on last, they add sparkle—just don't drop them, they roll everywhere!
- Fondant: Handy for shaping diplomas and ribbons—knead well for softness.
Tired of Takeout? 🥡
Get 10 meals you can make faster than delivery arrives. Seriously.
One email. No spam. Unsubscribe anytime.
Instructions
- Prepare Your Cake Pan:
- Line the pan with parchment and grease the surface—watch the corners, they love to stick. You’ll hear a gentle parchment crackle as you press it in.
- Cream Butter and Sugar:
- Set your mixer to medium and wait for the mixture to turn pale and fluffy. The sugary aroma signals it’s ready.
- Add Eggs and Vanilla:
- Drop eggs in one at a time, mixing thoroughly; the batter gets glossy. Stir in vanilla and pause to inhale its sweetness.
- Whisk Dry Ingredients:
- Combine flour, baking powder, and salt in a separate bowl. You’ll see it lighten as you whisk—no missed pockets!
- Alternate Dry and Wet:
- Add dry ingredients and milk in turns, mixing gently so the batter stays tender. The batter swirls thickly; don’t overmix.
- Bake the Cake:
- Pour into the prepared pan, smoothing the top; bake until golden and fragrant. The center should resist and spring back to touch.
- Cool Completely:
- Let the cake rest ten minutes in the pan, then invert onto a rack. The cooling cake fills the room with warm vanilla.
- Make the Buttercream:
- Beat butter until creamy, then slowly blend in powdered sugar, vanilla, and milk. Adjust the texture for easy spreading and piping.
- Tint and Divide Frosting:
- Split buttercream into bowls and add gel color for roses and leaves. Swirl each tint gently so colors stay vibrant.
- Frost the Cake:
- Smooth a thick layer of white buttercream over cooled cake using an offset spatula. Start at the edges for a clean finish.
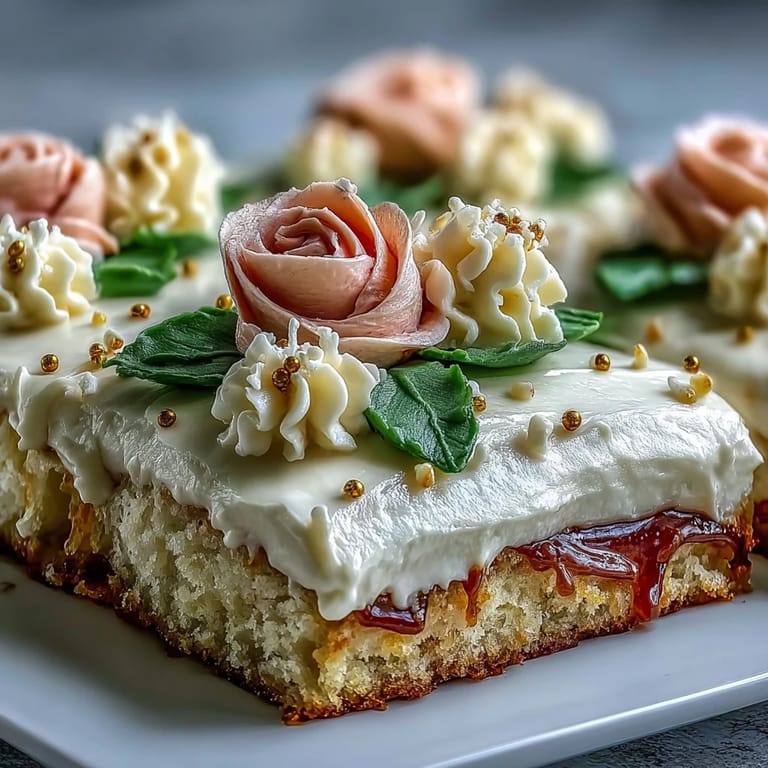
- Pipe Roses and Leaves:
- Using a rose tip, pipe blooms in your chosen colors, then add leaves with a leaf tip. Listen for whispers from the piping bag as you squeeze.
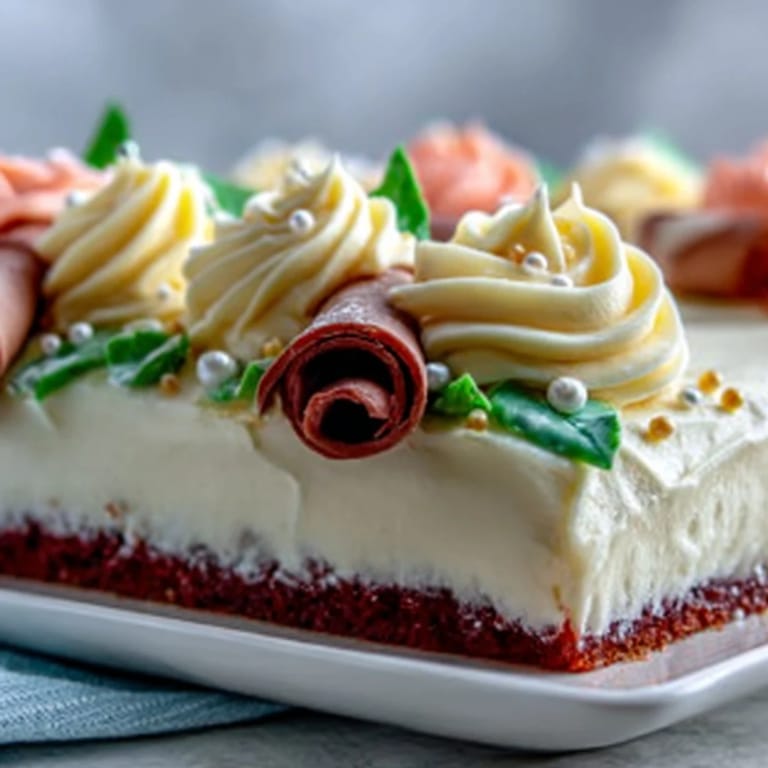
- Shape the Diploma:
- Roll fondant into a scroll, tie with a tiny ribbon; place gently atop the cake. Let it sit for a minute so it settles without cracking.
- Add Accents:
- Sprinkle edible pearls and school colors for flourish. Step back—your masterpiece is ready for applause.
 Save to Pinterest
 When my friend's son graduated, she asked me to bake this cake for his party, and seeing the kids line up for second helpings made my hours of piping feel totally worth it. The diploma garnish became a conversation piece, inspiring hilarious imitation scrolls made from napkins throughout the evening.
Decorating Tips That Make It Pop
Every time I reach for my piping bags, I remind myself that roses only need three good petals to look convincing. One trick I discovered: if your buttercream gets too warm, pause and stick it in the fridge—the details hold better. Adding school colors with ribbons or fresh berries brings a personal touch that feels more festive.
Troubleshooting Sticky Buttercream
On humid days, the buttercream can soften fast—adding an extra tablespoon of powdered sugar fixes it. If colors bleed, switch back to gel coloring, which always saves the look. Don’t panic if the first rose flops; a fresh piped leaf covers any mishap like magic.
Party Prep and Serving Tricks
Cakes always seem bigger on the counter than in slices, so I score light outlines before cutting. Serving pieces with an offset spatula keeps roses intact, and lining up plates in advance turns chaos into calm.
- If the diploma looks uneven, place extra pearls nearby for distraction.
- Keep the cake in the fridge until an hour before serving for best texture.
- Extra frosting doubles as cupcake decoration for leftover batter.
 Save to Pinterest
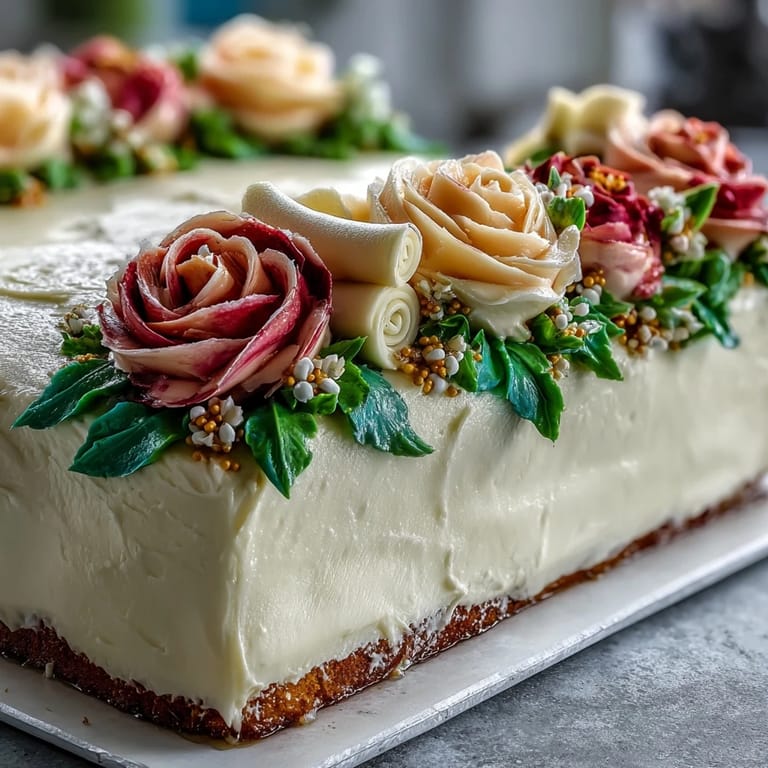
 This graduation cake always feels like a celebration centerpiece, making even small gatherings unforgettable. With vibrant colors and edible diploma, it's a showstopper you'll want to make for every milestone.
Recipe FAQs
- → What tips help achieve fluffy cake layers?
Ensure butter and sugar are creamed thoroughly and mix until ingredients are just combined to maintain light texture.
- → How can I color buttercream for vibrant roses?
Use gel food coloring to tint buttercream pink, red, yellow for roses, and green for leaves without thinning the frosting.
- → How do I make the edible diploma?
Shape fondant or white chocolate into a scroll and tie it with colored fondant ribbons for realism and easy placement.
- → Can the cake be adapted for chocolate flavors?
Replace ¾ cup of flour with unsweetened cocoa powder to create a rich chocolate base for this celebratory cake.
- → What tools are needed for decorating?
Gather piping bags, rose and leaf tips, offset spatula, and fondant tools to achieve detailed rose and diploma decorations.
- → How to personalize the cake for graduates?
Use school colors for buttercream accents, edible pearls, and ribbons, making the cake unique for each celebration.